New Minimod: Generate CSV-files in MVC-Application using CsvHelper

Just uploaded a new Minimod for simple generation of CSV files from a MvcControllers’ action with the help of CsvHelper.

Usage

return new CsvHelperFileResult<RecordType, RecordCsvMap>(records, ";")
{
    FileDownloadName = "my-csv-file.csv"
};

Find the source code here: CsvHelperMvcActionResult

BTW: Minimods uses nuget to distribute helper-classes as source code instead of compiled libraries.

Architecture Open Space 2012, 9.+10. Nov, Ratingen, Germany

The last Architecture Open Spaces were great. Really great! (2009, 2010)

Now it’s time again. Trust me, you can’t spend your days better. (at least in the context of continuous improvement!)

Have a look at Architecture.Openspace 2012 (German)…

Topics I’m interested in discussing (and partially have solutions for):

  • Distributed Systems Design
  • Transactions? Really?
  • Consistency?
  • Search
  • Messaging / NServiceBus
  • Alternative Data Storage / Raven DB
  • Developer Setup, Build, Versioning, Deployment, Hosting
  • Composite Distributed Web Applications

Would be great to see you there. Speaking german is not really a requirement; I guess english should be fine for all software architects.

KnockoutJS Binding Handler: autosizing input fields

If you use KnockoutJS and want your input-fields to automatically grow and shrink with the input, use this custom handler.

Usage

<input 
  type="text" 
  data-bind="autosize: {
    maxWidth: 500, 
    minWidth: 100, 
    comfortZone: 15
}"/>

Code

Original code from javascript – Is there a jQuery autogrow plugin for text fields?

ko.bindingHandlers.autosize = {
   init: function(element, valueAccessor, allBindingsAccessor, viewModel) {
        var o = $.extend({
           maxWidth: 1000,
           minWidth: 0,
           comfortZone: 70
       }, valueAccessor());
        var minWidth = o.minWidth || $(element).width(),
           val = '',
           input = $(element),
           testSubject = $('<tester/>').css({
               position: 'absolute',
               top: -9999,
               left: -9999,
               width: 'auto',
               fontSize: input.css('fontSize'),
               fontFamily: input.css('fontFamily'),
               fontWeight: input.css('fontWeight'),
               letterSpacing: input.css('letterSpacing'),
               whiteSpace: 'nowrap'
           }),
           check = function() {
                if (val === (val = input.val())) {
                   return;
               }
                // Enter new content into testSubject
               var escaped = val.replace(/&/g, '&amp;').replace(/\s/g, ' ').replace(/</g, '&lt;').replace(/>/g, '&gt;');
               testSubject.html(escaped);
                // Calculate new width + whether to change
               var testerWidth = testSubject.width(),
                   newWidth = (testerWidth + o.comfortZone) >= minWidth ? testerWidth + o.comfortZone : minWidth,
                   currentWidth = input.width(),
                   isValidWidthChange = (newWidth < currentWidth && newWidth >= minWidth)
                       || (newWidth > minWidth && newWidth < o.maxWidth);
                // Animate width
               if (isValidWidthChange) {
                   input.width(newWidth);
               }
            };
        testSubject.insertAfter(element);
        ko.utils.registerEventHandler(element, 'keyup keydown blur update', check);
    }
    };

Tracking mailto, anchors and external links with Google Analytics

With this simple snippet, all clicks on page-internal anchors, external links (http…) and mailto-links are tracked as events in Google Analytics:

$(function(){
    $("a[href*='http']").each(function() {
                    $(this).click(function (ev) {
                        var pageView = '/outgoing/' + $(this).attr('href');
                        _gat._getTrackerByName()._trackEvent('Outbound Links', pageView);
                        var _href = $(this).attr('href');
                        setTimeout(function() {
                            location.href = _href;
                        }, 100);
                        ev.preventDefault();
                        return false;
                    });
        });
      $("a[href*='mailto']").each(function() {
                    $(this).click(function (ev) {
                        var pageView = '/mailto/' + $(this).attr('href').substring(7);
                        _gat._getTrackerByName()._trackEvent('Mailto', pageView);
                    });
        });
      $("a[href*='#']").each(function() {
                    $(this).click(function (ev) {
                        var pageView = '/anchor/' + $(this).attr('href').substring(1);
                        _gat._getTrackerByName()._trackEvent('Anchors', pageView);
                    });
        });
});

How to authorize Local System Account for OpenSSH

We have Jenkins installed and want it to pull from bitbucket and github – authorization should happen through Open SSH (Public Keys).

Jenkins runs as Local System.

The problem

How to find and then place id_rsa into ~/.ssh? How to get it to add things to ~/.ss/known_hosts?

The solution

As always: fake it until you make it!

  1. Run this command in an elevated command prompt on the server, in order to start a command prompt as Local System user:

    sc create testsvc binpath= "cmd /K start" type= own type= interact && sc start testsvc & sc delete testsvc

    The Interactive Services Detection will now bring up a dialog (probably in the background) where it asks you to “View the message” in order to display the service session where the command window will run.

  2. Run echo %userprofile% to see where your storage is… In my case it is "C:\Windows\system32\config\systemprofile”.

    Odd, but true: Sadly, when i try to put the id_rsa file into that directory from my normal user session, it somehow doesn’t make it into the local system accounts profile.
  3. From here you can open the git bash by running C:\Program Files (x86)\Git\bin\sh –login –i
  4. Then run cd ~ to switch to your home directory.
  5. Then copy your id_rsa file here with a simple
    cp <id_rsa-location> .
  6. Now run ssh git@bitbucket.org in order to try to authenticate and accept the host as known host.

BTW: also make sure you run git.cmd, not git.exe!!

Other posts that helped (and confused) me:

What the Azure Tools do to your Cloud Service Configuration

For my current work on Azure integration for NPanday I’m investigating what the Azure Tools do with the Service Configuration (*.cscfg) on publish, since the file in Visual Studio it isn’t the same as one which is deployed along with the Cloud Service Package (*.cspkg).

The build & package part for Azure Cloud Services can be found in %Program Files (x86)%\MSBuild\Microsoft\VisualStudio\v10.0\Windows Azure Tools\1.6\Microsoft.WindowsAzure.targets

Find and copy

First, the build tries to figure out which configuration to build use as input by checking for ServiceConfiguration.$(TargetProfile).ccfg and ServiceConfiguration.ccfg, while $(TargetProfile) is “Cloud” by default.

As a part of the build, after being copied, the configuration file is augmented with more settings.

Add “file generated” comment

That was why I noticed, that the files are different. The comment in the target file makes it look like the file is generated from scratch, but instead it is just a copy which changed here and there. By default, the comment is the only change 🙂

<AddGeneratedXmlComment
  GeneratedFile="@(TargetServiceConfiguration)"
  SourceFile="@(SourceServiceConfiguration)" />

Cloud Tools version

If IntelliTrace or profiling is enabled, this change lets Azure know which versions of the tools are in use.

<AddSettingToServiceConfiguration
   ServiceConfigurationFile="@(TargetServiceConfiguration)"
   Setting ="$(CloudToolsVersionSettingName)"
   Value="$(CloudToolsVersion)"
   Roles="@(DiagnosticAgentRoles)"
   Condition="'$(EnableProfiling)'=='true' or '$(EnableIntelliTrace)'=='true'" />

Intelli Trace

If IntelliTrace is enabled, it will add a connection string to the configuration:

<AddIntelliTraceToServiceConfiguration
  ServiceConfigurationFile="@(TargetServiceConfiguration)"
  IntelliTraceConnectionString="$(IntelliTraceConnectionString)"
  Roles="@(DiagnosticAgentRoles)"/>

Profiling

If profiling is enabled, it will add an connection string, where to store profiling data.

<AddSettingToServiceConfiguration
  ServiceConfigurationFile="@(TargetServiceConfiguration)"
  Setting ="Profiling.ProfilingConnectionString"
  Value="$(ProfilingConnectionString)"
  Roles="@(DiagnosticAgentRoles)" />

Remote Desktop

If remote desktop is set to be enabled, the build configures this switch in the cloud service configuration, too:

<ConfigureRemoteDesktop
      ServiceConfigurationFile="@(TargetServiceConfiguration)"
      ServiceDefinitionFile="@(TargetServiceDefinition)"
      Roles="@(RoleReferences)" 
      RemoteDesktopIsEnabled="$(EnableRemoteDesktop)"
      />  

Web Deploy

If WebDeploy is enabled for any of your web roles, it will add an endpoint to the definition and set the instance count to zero for all web roles in the service configuration.

<EnableWebDeploy
  ServiceConfigurationFile="@(TargetServiceConfiguration)"
  ServiceDefinitionFile="@(TargetServiceDefinition)"
  RolesAndPorts="$(WebDeployPorts)" />

Connection String Override

If ‘ShouldUpdateDiagnosticsConnectionStringOnPublish’ is set to true, the diagnostics connection string is overridden for all roles in order to prevent the default setting “UseDevelopmentStorage=true” to be published to the cloud.

This is one of the typical “Microsoft demo-ready” features. Most certainly you’ll have multiple role-spanning connection strings or settings that you’d like to change on publish, but this is the only one needed to get demos to run, right?

<SetServiceConfigurationSetting 
  Roles="$(DiagnosticsConnectionStringRoles)"
  ServiceConfigurationFile="@(TargetServiceConfiguration)"
  Setting="$(DiagnosticsConnectionStringName)"
  Value="$(DiagnosticsConnectionStringValue)" />

Corresponding parameters in NPanday

The most complex part in the build is the setup for profiling and IntelliTrace; currently we have no plans on supporting these in NPanday. We will rather just deploy from Visual Studio, in case we need profiling or IntelliTrace.

I still have to look at how RDP and MSDeploy can be added to the configured service configuration; for a first release of NPanday that may have to be done manually.

Plexus Container Annotations and Maven 2 Mojos

I’ll make it short: it’s a mess. You can’t use plexus container 1.5-tooling (with java annotations), if you have to load your components in a plexus 1.0.x-container – which is the case, if your components are utilized in a Maven 2.2.x Mojo. This is simply because plexus container 1.5.x uses “default” as a default role-hint, while NULL is the default in plexus 1.0.x.

But you can use the old tooling, plexus-maven-plugin. But by default it fails if it sees any annotation in your source code, because it uses a version of qdox that doesn’t know annotations yet.

Also, when generating the component descriptor it doesn’t merge with the manually defined one in src/resources (the new one does).

And since, by default, the merge-descriptors goal runs before descriptor (generate) goal, you have to do some back flips to get that running too.

Well here is a configuration that works. At least in my project. Today.

<plugin>
  <groupId>org.codehaus.plexus</groupId>
  <artifactId>plexus-maven-plugin</artifactId>
  <version>1.3.8</version>
  <dependencies>
    <dependency>
      <groupId>com.thoughtworks.qdox</groupId>
      <artifactId>qdox</artifactId>
      <version>1.12</version>
    </dependency>
  </dependencies>
  <executions>
    <execution>
      <phase>process-classes</phase>
      <goals>
        <goal>descriptor</goal>
        <goal>merge-descriptors</goal>
      </goals>
      <configuration>
        <!-- descriptor config -->
        <outputDirectory>${project.build.directory}</outputDirectory>
        <fileName>plexus/auto-components.xml</fileName>

        <!-- merge config -->
        <descriptors>
          <descriptor>${project.build.directory}/plexus/auto-components.xml</descriptor>
          <descriptor>${basedir}/src/main/resources/META-INF/plexus/components.xml</descriptor>
        </descriptors>
      </configuration>
    </execution>
  </executions>
</plugin>

Note: If you only want to use automatic descriptors, remove all <configuration>…</configuration> contents. The defaults will work then.

You can define that in build/pluginManagement/plugins in your parent pom. Then in your project pom, you just put these four lines in build/plugins:

<plugin>
  <groupId>org.codehaus.plexus</groupId>
  <artifactId>plexus-maven-plugin</artifactId>
</plugin>

Create branches with Maven Release Plugin (SVN)

I’m currently working on Azure and web packaging (MSDeploy) support for NPanday. I want to do that on a separate SVN branch, which I’ll then reintegrate later on.

The current trunk version is 1.4.1-incubating-SNAPSHOT, and since we are about to release that upcoming version 1.4.1-incubating soon, I don’t want to pollute it with half-baked changes, while I’ll still need to develop on the trunk in parallel.

I’ll also need to be able to install both the current trunk and my experimental branch in my local Maven repository at the same time, hence I need a new temporary version for my branch. All this can be achieved using the Maven Release Plugin, in particular the branch goal. Maven Release supports 14 SCMs through the same interface; in this case we use SVN, though.

What I want

How-to

The command I need to run

mvn release:branch 
   -DbranchName=1.5.0-azuresupport
   -DautoVersionSubmodules=true
   -DsuppressCommitBeforeBranch=true 
   -DremoteTagging=false 
   -DupdateBranchVersions=true 
   -DupdateWorkingCopyVersions=false 

Lets go through the settings line-by-line:

mvn release:branch

Loads and executes the branch-goal from the Maven Release Plugin.

-DbranchName=1.5.0-azuresupport

The name for the branch to be created. When on trunk, Maven figures out to use the default SVN layout for branches and tags. You can optionally define the branch base using the parameter branchBase like this: –DbranchBase=https://svn.apache.org/repos/asf/incubator/npanday/branches/

-DautoVersionSubmodules=true

When ran, Maven will prompt for the version to be used in the branch. I provided 1.5.0-azuresupport-SNAPSHOT. Since autoVersionSubmodules is set to true, Maven Release will automatically use this versions for all submodules and hence also update all inner-project dependencies to that version.

The next four settings go hand-in-hand.

-DsuppressCommitBeforeBranch=true

By default, Maven Releases creates intermediate commits to the current working copy. I’m not sure of the reason, but I think it was because some VCS do not support branching/tagging of modified working copies. This parameter makes sure, no intermediate commits are made to the working copy.

-DremoteTagging=false

With SVN, by default, tags are created remotely. If you want to ommit intermediate commits, this must be set to false.

-DupdateBranchVersions=true

-DupdateWorkingCopyVersions=false

When branching, you can either define new versions for the current working copy, or the new branch, or both. As set here, the working copy will be left alone, and the plugin will ask for a new version for the branch.

Now I can switch forth and back between the trunk and the new branch, but still build and deploy artifacts side-by-side.

Defaults in POM

You may also provide the fixed values in the POM. And if you want to avoid interfering with other Maven Release actions, you might want to use a profile.

<profile>
  <id>branch</id>
  <activation>
    <property>
      <name>branchName</name>
    </property>
  </activation>
  <build>
    <plugins>
      <plugin>
        <groupId>org.apache.maven.plugins</groupId>
        <artifactId>maven-release-plugin</artifactId>
        <version>2.2.1</version>
        <configuration>
          <branchBase>https://svn.apache.org/repos/asf/incubator/npanday/branches</branchBase>
          <autoVersionSubmodules>true</autoVersionSubmodules>
          <suppressCommitBeforeBranch>true</suppressCommitBeforeBranch>
          <remoteTagging>false</remoteTagging>
          <updateBranchVersions>true</updateBranchVersions>
          <updateWorkingCopyVersions>false</updateWorkingCopyVersions>
        </configuration>
      </plugin>
    </plugins>
  </build>
</profile>

Now it will be enough, when I run mvn release:branch –DbranchName=1.5.0-azuresupport

Activity Log Profiler: Find out which extension is slowing down your Visual Studio

As I’m doing some work for the NPanday Visual Studio Addin, I bugs me even more that my Visual Studio 2010 currently needs about 40 seconds to start.

Actually I do not wonder at all, as I installed every single extension I ever found interesting. But, should I now disable them all, or rather find out which one takes the most time?

I did the latter.

After reading Did you know… There’s a way to have Visual Studio log its activity for troubleshooting? – #366 via (visual studio – VS2010 loads slowly. Can I profile extensions’ respective startup time? – Stack Overflow)

There it says, that if you start VS using devenv /Log, it will log it’s acitivity to  %AppData%\Roaming\Microsoft\VisualStudio\10.0\ActivityLog.xml (for VS 2010). And it even comes with an XML that provides some output:

image

New XSL with Profiling Capabilities

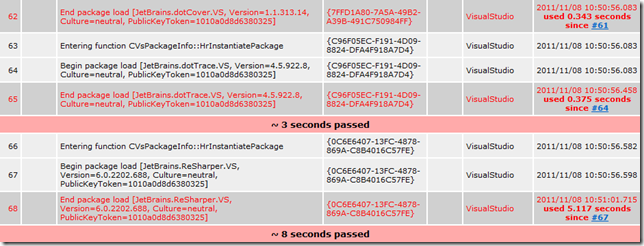
So I tweaked the XSL to be a little bit more “profiling-friendly”. It will now:

  • Tell me how long it took load each package
  • Give me a visual indicator each 1 second (configurable)
  • Mark each “End package load” line red, that exceeds a certain configurable threshold (default 500 ms).
  • Mark each normal line read, if it exceeds the configured threshold.

image

image

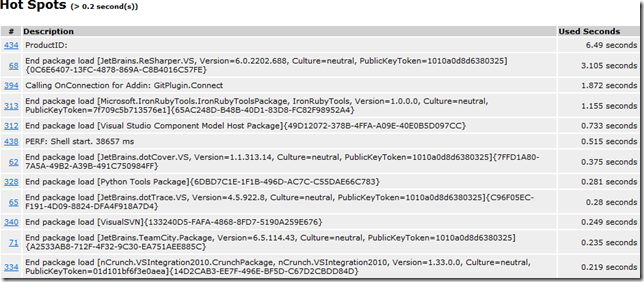
Hotspots

image

Download and use with GIT

  1. Open Commandwindow in %AppData%\Roaming\Microsoft\VisualStudio\10.0
  2. Run git clone https://github.com/lcorneliussen/ActivityLogProfiler
  3. Start Visual Studio with ‘/Log’ switch
  4. Run deploy.cmd (will overwrite default ActivityLog.xsl in parent folder; Visual Studio will replace it after restart!)
  5. Open ActivityLog.xml in Internet Explorer

You can also download it manually (from here) and replace %AppData%\Roaming\Microsoft\VisualStudio\10.0\ActivityLog.xsl manually after each Visual Studio Run.

But with GIT you can easily get updates; and it makes it easier to submit patches, which I’ll be happy to apply.

Attention: Now you only have to repeat 3) and 4) to produce new logs, as Visual Studio will recreate both ActivityLog.xml and ActivityLog.xsl each time it is started with ‘/Log’.

Easily install Fitnesse (or any Java App) as Windows Service / NT Service

After I had to search for this solution all to long, I thought I’d share it:

1. Download NSSM – the Non-Sucking Service Manager

Unzip the zip package you can download from their home page (http://nssm.cc/download/nssm-2.10.zip). You’ll find nssm.exe in win32 and win64; pick the one appropriate to your platform.

2. Install Fitnesse as Service

Run this from command line (adjust paths and port):

nssm install FitnesseService java –jar <path-to-jar>\fitnesse.jar –d <installation-path> –p <your port> <further-options>

If you need to retry, stop the service, then run: nssm remove FitnesseService confirm

3. Start Fitnesse Service

Run net start BmmService or start it from the service manager.